
Getting started guide
Install the app, set it up and take one order all the way from receiving a lot to shipping it. Once you’ve done that, you’ve used the parts you’ll use every day.
1. Install and open the app
No card or account is needed. Download the trial for your computer from the download box, then follow the steps for Windows or Mac.
On Windows
You need a Windows 10 or 11 PC (64-bit). The download is a 115 MB zip. There’s no separate installer: the app sets itself up the first time you open it.
- Unzip the download anywhere, such as Downloads. Don’t run it from inside the zip.
- Open the folder and double-click Vial Workspace.exe.
- If Windows says “Windows protected your PC”, click More info, then Run anyway. It only asks the first time. Why Windows says this
- The app asks whether to set itself up on this PC. Click Yes: it moves to a Vial Workspace folder in your user folder, adds it to the Start menu and the desktop, and opens. That’s it.
Your records are saved in that Vial Workspace folder, so keep the folder together. If you said No, you can add the shortcuts later in Settings → License and Support → Shortcuts.
On a Mac
You need macOS 14 (Sonoma) or newer. The download is a 125 MB disk image. It runs on Intel Macs, and on Macs with an Apple chip through Rosetta, which macOS offers to install the first time.
- Open the download, VialWorkspace-Mac.dmg. A window opens showing Vial Workspace and your Applications folder.
- Drag Vial Workspace onto Applications. You can then eject the disk image.
- Open Applications and double-click Vial Workspace. The first time, your Mac asks whether you want to open an app downloaded from the Internet: click Open. It only asks this once. Why the Mac asks
- On a Mac with an Apple chip, macOS may ask to install Rosetta. Click Install, then open Vial Workspace again.
Your records are saved in your user’s Library → Application Support → Vial Workspace folder, not with the app, so replacing the app with a new version keeps them.
Your 14-day trial starts the first time you open the app, with every Pro feature on.
2. Set up your business
- Read the License Agreement, tick the box and click I agree.
- Choose the parts of the app you use. You can change this later, and switching a part off doesn’t delete anything.
- On the Welcome page, open Settings → Company. Add your business name, contact details and logo. They print on your invoices, statements and packing slips.
The menu runs down the side of every page. Help at the bottom of the menu has a “How do I…” card for each everyday job, and a setup checklist that ticks itself off as you go.
3. Bring in your records
Already keep your records in a spreadsheet? Import them now. Starting fresh, or want to try the app with one product first? Skip to step 4.
- Go to Import & Export → Update from spreadsheet and download the blank template.
- Copy your records in. There’s one tab for each kind of record, and the Column guide tab explains every column.
- Upload the file. The app tries every row first, then lists any that won’t go in, with totals to compare against your old records.
- Click Apply once it looks right. A backup is taken first, and uploading the same file twice adds nothing.
If you sell through a WooCommerce store or take orders on JotForm or EZFormz, Help has a step-by-step card for bringing those in too. Prefer to hand it over? We can move your data for you as a paid extra.
4. Add a product and a lot
A product is what you sell. A lot is one batch of it that you received, with its own count, cost and COA.
- Go to Catalog → New product. Enter the SKU, name and retail price, then save.
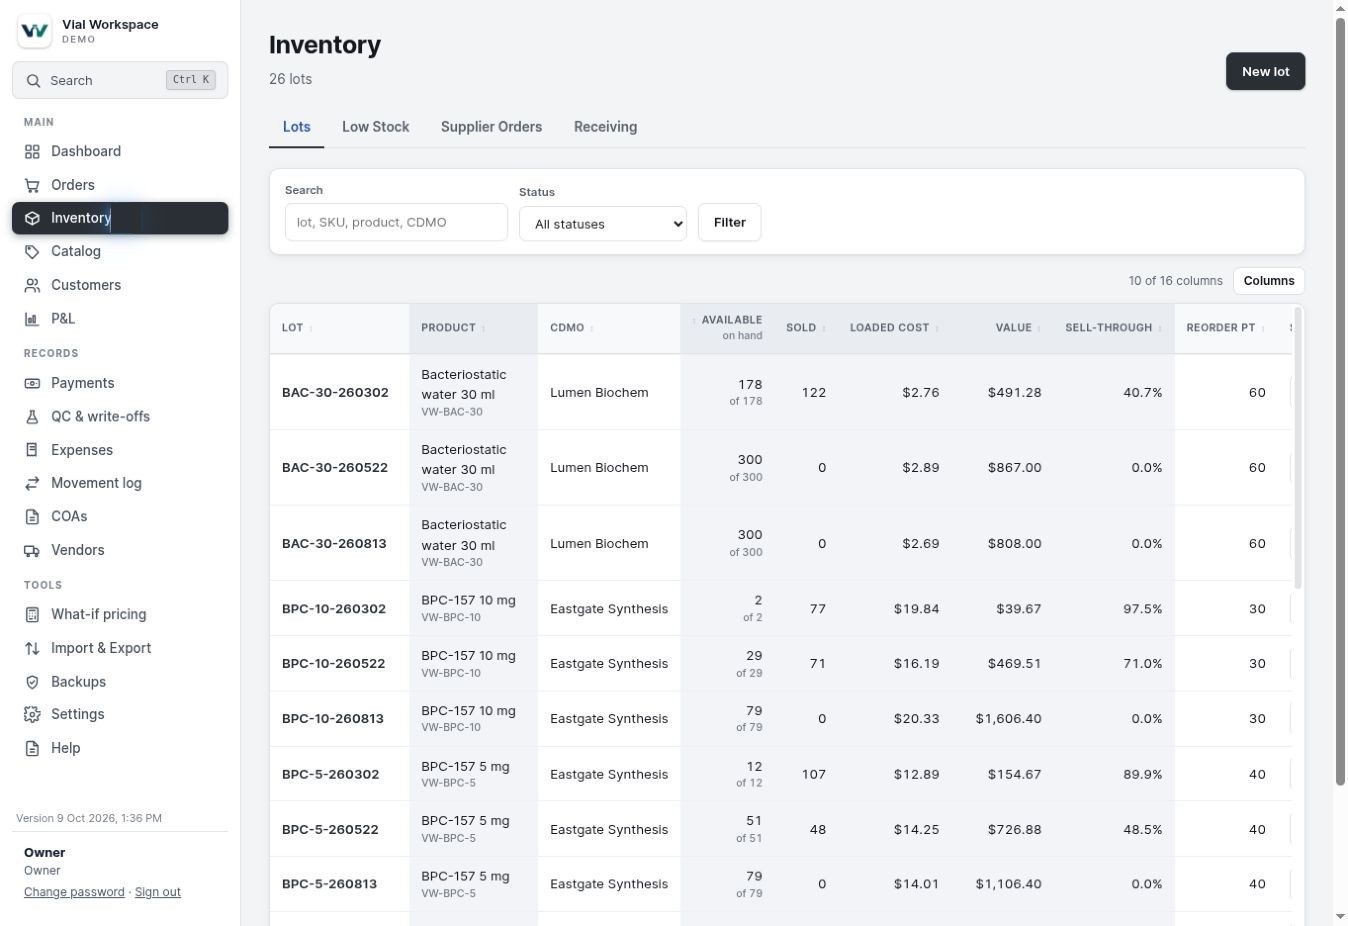
- Go to Inventory → New lot. Choose the product, then enter how many vials or kits you received, the cost, and the shipping and fees for the whole lot.
- Go to COAs → Add COA and choose the file. The app reads it and suggests the lot. Check the values, then file it. Any failed result is flagged in red.
Why can’t I sell my new lot? New lots start in Quarantine, and quarantined lots aren’t sold. The lot becomes Available by itself once its COA has every test marked Pass or Not tested, with no open query with the lab. Trying the app without a COA? Edit the lot and set its Status to Available.
5. Take an order
- Go to Customers → New customer and enter their name, contact details and shipping address.
- Go to Orders → New order and pick the customer.
- Add each product and how many. The lot is picked for you, oldest stock first. You can choose another on the order.
- Add any promo code, shipping and tax under the order lines.
If you record research-use agreements in the app, add them on the customer’s page. An order for a customer with no agreement shows a No agreement mark in the shipping list. The mark is a reminder and doesn’t stop you shipping.
6. Record a payment and invoice it
- Open the order and go to Payments.
- Enter the amount, date and how they paid. Attach a screenshot if you have one, then click Record payment. The balance due updates straight away.
- Use Invoice / receipt on the order to print it or download a PDF. For everything a customer owes, open their page and use Statement.
The app has no place for card numbers, and it doesn’t need one. It records the method, the amount and your proof.
7. Pack and ship
- Go to Orders → Shipping. Everything waiting to go out is listed, oldest first, with a mark on anything that needs a look.
- Tick the orders and click Print packing slips.
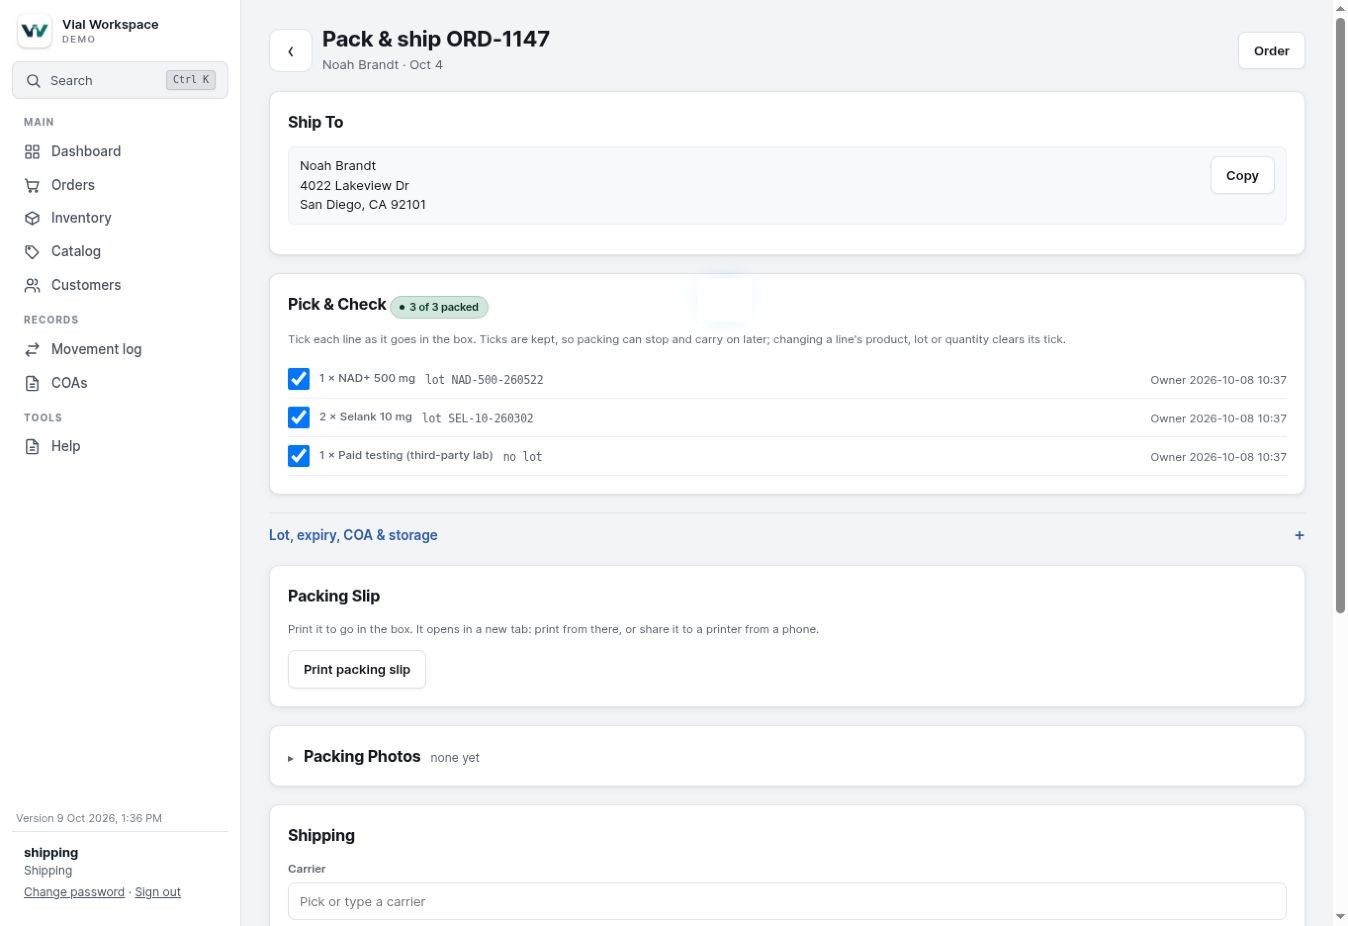
- Click Pack & ship on an order and tick each line as it goes in the box. Your ticks are kept if you stop halfway. Add a photo of the open box if you like.
- Type the tracking number and click Mark as shipped. The carrier is worked out from the number.
8. Check your numbers
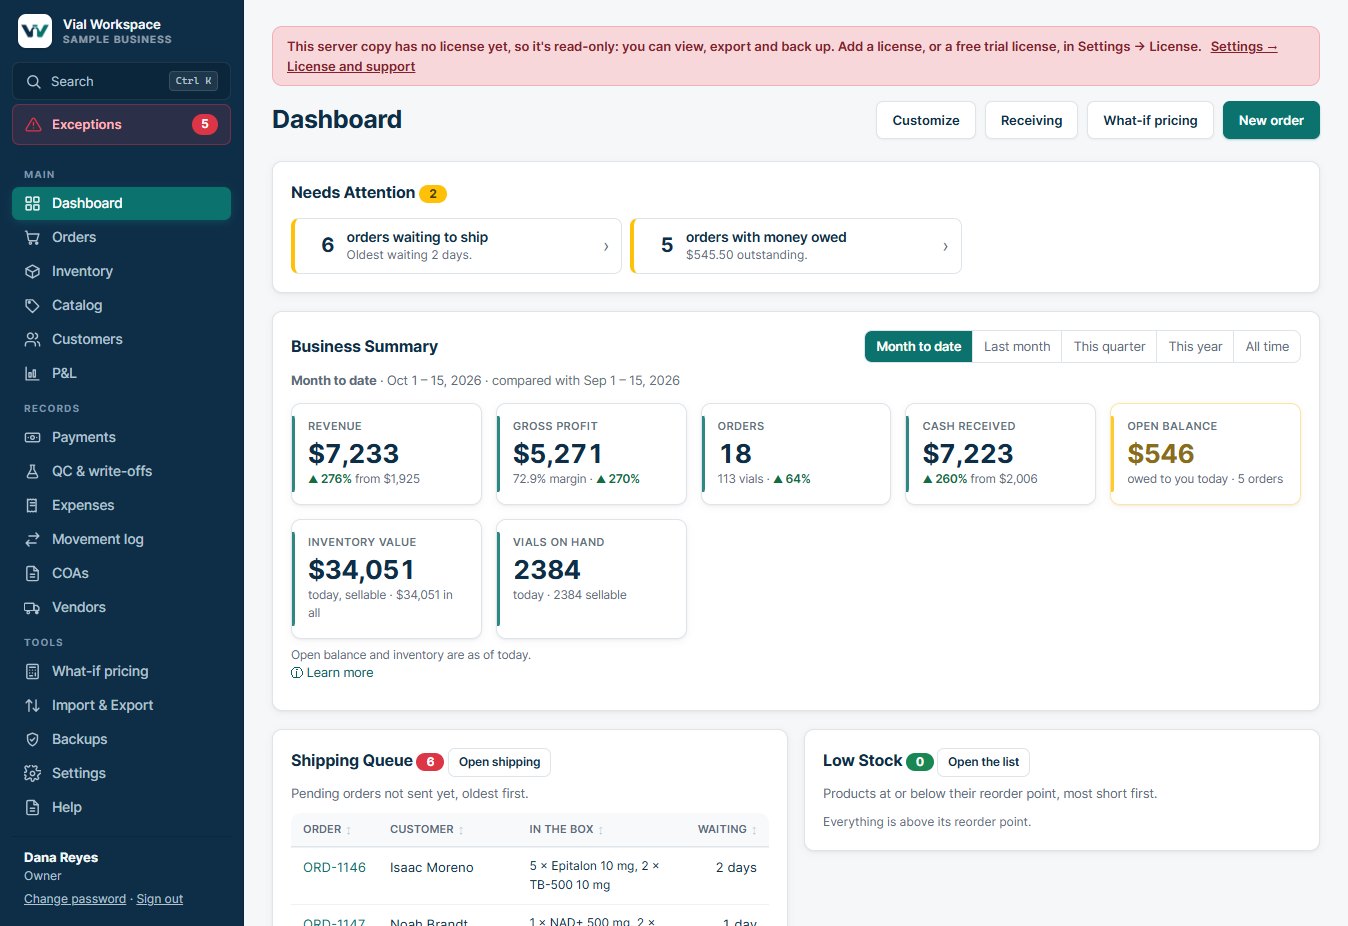
- Dashboard: what needs doing today, then revenue, profit and cash for the period you pick.
- The order: what that order cost you and what it earned, from the lot’s loaded cost, payment fees and postage.
- P&L: your full profit and loss for any period, and the Year-end package for your accountant.
- Exceptions: anything that makes a number wrong, most serious first, with a link to fix it.
9. Back up your records
Your records live on your PC, so a backup somewhere else protects you if the PC fails. Do this before you start relying on the app.
- Go to Backups, choose a folder on a USB drive or in a cloud folder, and click Back up now.
- Tick the box to back up there automatically every time the app opens.
- If you set a backup password, write it down. If it’s lost, nobody can open those backups, including us.
The app also takes its own snapshot when it opens and once a day. Those stay on the same PC, so they help you undo a mistake but won’t save you if the PC fails.
10. When something goes wrong
| What happened | What to do |
|---|---|
| A customer wants money back or returns vials | Open the order and click Refund / return… Choose how many vials go back in stock, then money back, store credit or off what they owe. |
| A package was lost or damaged in the mail | Open the order and click Reship… It makes a linked $0 replacement and keeps the claim with it. |
| An order is canceled before it ships | Set the order’s status to Cancelled. The vials go back into their lots. |
| Vials were damaged, lost or used for testing | Go to QC & write-offs and pick the lot, the reason and how many vials. |
| You made a mistake you can’t easily fix | Go to Backups and restore a snapshot. Anything entered since that snapshot is undone, and your data from before the restore is saved first. |
11. Add staff and phones (Pro)
You can try these during the trial. To keep them after it ends, you’ll need Pro.
- Go to Settings → Users. Add yourself as Owner first, then each person with their role.
- Turn sign-in on. Each person then uses their own username and password, and their role decides what they can see and change.
- To use phones or other PCs, switch them on in Settings → Phones and other PCs. You get an address and a QR code to scan, and nothing is installed on the phone.
- If Windows asks whether to allow the app on networks, tick Private networks only. Use this on your own Wi-Fi, and keep the app open on the main PC.
12. When the trial ends
If you haven’t added a license after 14 days, the app becomes read-only. You can still view, search, export and back up everything, and nothing is deleted.
- Click Buy a license on the strip at the top of the app, or in Settings → License and support. Compare Standard and Pro
- After paying, you’ll get an email with a link to your license file.
- In Settings → License and support, choose the file and click Add license. Everything carries on where you left it, with nothing to enter again.
If you choose Standard, Pro features leave the menus. Anything you set up with them during the trial is kept.
13. If you get stuck
- Blocked by Windows with no Run anyway button? Some new Windows 11 PCs have Smart App Control on, and it can’t make an exception for one app. To run Vial Workspace, open Windows Security → App & browser control → Smart App Control settings and choose Off. On older versions of Windows 11, you can’t turn it back on without resetting or reinstalling Windows.
- An order shows “Stock problem”? A line has no lot, too few vials left, or a lot that can’t be sold. Check the lot’s status and count in Inventory.
- Moving to another computer? On the old one, go to Backups → Save a Full Backup. On the new one, choose Restore From a Backup File (also on the Welcome page of a new copy): your records, files, logo and license come across.
- Need something this guide doesn’t cover? Open Help in the app. It covers every feature and works offline.
Still stuck? Email [email protected].